前言
本系列文章通过日常中比较常见 ReentrantLock 开始,逐步揭开AQS的底层。
lock()
1
2
3
4
5
6
7
| ReentrantLock lock = new ReentrantLock();
try{
lock.lock();
}finally {
lock.unlock();
}
|
日常我们会这样使用 ReentrantLock
1
2
3
4
5
6
7
8
9
10
11
12
|
final void lock() {
if (compareAndSetState(0, 1))
setExclusiveOwnerThread(Thread.currentThread());
else
acquire(1);
}
|
上面代码中 compareAndSetState 、 setExclusiveOwnerThread 、 acquire 三个方法都是AQS下的。
acquire()
1
2
3
4
5
| public final void acquire(int arg) {
if (!tryAcquire(arg) &&
acquireQueued(addWaiter(Node.EXCLUSIVE), arg))
selfInterrupt();
}
|
addWaiter
1
2
3
4
5
6
7
8
9
10
11
12
13
14
15
16
17
18
19
20
21
| private Node addWaiter(Node mode) {
Node node = new Node(Thread.currentThread(), mode);
Node pred = tail;
if (pred != null) {
node.prev = pred;
if (compareAndSetTail(pred, node)) {
pred.next = node;
return node;
}
}
enq(node);
return node;
}
|
关于 compareAndSetTail 方法深挖可以发现他是一个 native 修饰的方法。
高并发下难免会出现多线程并发去追加尾巴节点,防止追加错乱。使用了CAS没有使用其他锁是因为,CAS的颗粒比较小,永远只需要盯着 pred 作比较,无需锁住整个链表。
acquireQueued
上文解释了 addWaiter 方法,这个方法其实就是把对应的线程以Node的数据结构形式加入到双端队列里,返回的是一个包含该线程的Node。而这个Node会作为参数,进入到 acquireQueued 方法中。 acquireQueued 方法可以对排队中的线程进行“获锁”操作。
总的来说,一个线程获取锁失败了,被放入等待队列, acquireQueued 会把放入队列中的线程不断去获取锁,直到获取成功或者不再需要获取(中断)。
下面我们从“何时出队列?”和“如何出队列?”两个方向来分析一下acquireQueued源码:
1
2
3
4
5
6
7
8
9
10
11
12
13
14
15
16
17
18
19
20
21
22
23
24
25
26
27
28
29
30
31
32
33
|
final boolean acquireQueued(final Node node, int arg) {
boolean failed = true;
try {
boolean interrupted = false;
for (;;) {
final Node p = node.predecessor();
if (p == head && tryAcquire(arg)) {
setHead(node);
p.next = null;
failed = false;
return interrupted;
}
if (shouldParkAfterFailedAcquire(p, node) && parkAndCheckInterrupt())
interrupted = true;
}
} finally {
if (failed)
cancelAcquire(node);
}
}
|
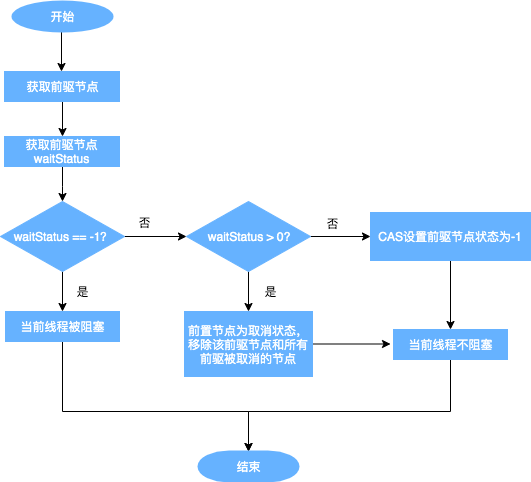
shouldParkAfterFailedAcquire
1
2
3
4
5
6
7
8
9
10
11
12
13
14
15
16
17
18
19
20
21
22
|
private static boolean shouldParkAfterFailedAcquire(Node pred, Node node) {
int ws = pred.waitStatus;
if (ws == Node.SIGNAL)
return true;
if (ws > 0) {
do {
node.prev = pred = pred.prev;
} while (pred.waitStatus > 0);
pred.next = node;
} else {
compareAndSetWaitStatus(pred, ws, Node.SIGNAL);
}
return false;
}
|
parkAndCheckInterrupt
1
2
3
4
| private final boolean parkAndCheckInterrupt() {
LockSupport.park(this);
return Thread.interrupted();
}
|
parkAndCheckInterrupt主要用于挂起当前线程,阻塞调用栈,返回当前线程的中断状态。
总结
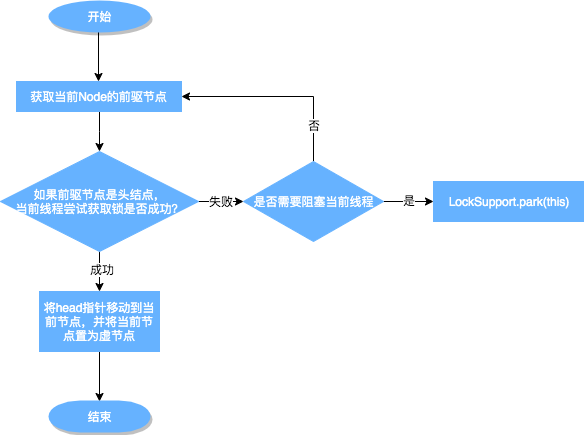
从上图可以看出,跳出当前循环的条件是当“前置节点是头结点,且当前线程获取锁成功”。为了防止因死循环导致CPU资源被浪费,我们会判断前置节点的状态来决定是否要将当前线程挂起,具体挂起流程用流程图表示如下(shouldParkAfterFailedAcquire流程):
从队列中释放节点的疑虑打消了,那么又有新问题了:
- shouldParkAfterFailedAcquire中取消节点是怎么生成的呢?什么时候会把一个节点的waitStatus设置为-1?
- 是在什么时间释放节点通知到被挂起的线程呢?
cancelAcquire
通过cancelAcquire方法,将Node的状态标记为CANCELLED。接下来,我们逐行来分析这个方法的原理:
1
2
3
4
5
6
7
8
9
10
11
12
13
14
15
16
17
18
19
20
21
22
23
24
25
26
27
28
29
30
31
32
33
34
35
36
|
private void cancelAcquire(Node node) {
if (node == null)
return;
node.thread = null;
Node pred = node.prev;
while (pred.waitStatus > 0)
node.prev = pred = pred.prev;
Node predNext = pred.next;
node.waitStatus = Node.CANCELLED;
if (node == tail && compareAndSetTail(node, pred)) {
compareAndSetNext(pred, predNext, null);
} else {
int ws;
if (pred != head && ((ws = pred.waitStatus) == Node.SIGNAL || (ws <= 0 && compareAndSetWaitStatus(pred, ws, Node.SIGNAL))) && pred.thread != null) {
Node next = node.next;
if (next != null && next.waitStatus <= 0)
compareAndSetNext(pred, predNext, next);
} else {
unparkSuccessor(node);
}
node.next = node;
}
}
|
